Showing posts with label Pork. Show all posts

Monday, May 21, 2012

Grilled Balsamic-Garlic Marinated Pork Tenderloin


Grilled Balsamic-Garlic Marinated Pork Tenderloin
(Original recipe found at www.kitchenconfidante.com. The recipe can be found here)

 Ingredients:
1 pork tenderloin
4-5 garlic cloves, minced
2 Tbsp balsamic vinegar
2 1/2 tsp coarse salt
1/2 tsp pepper
2 Tbsp olive oil
2 Tbsp canola oil (if preparing in oven)

Directions:
Stir together garlic, balsamic vinegar, salt, pepper, and olive oil in a small bowl. Put in large ziplock bag and all the pork. If you have the time, marinate overnight. If not, let it marinate for at least an hour. It will still be great!

Grill preparation:
Sear the tenderloins on all sides, then grill for about 20-30 minutes, rotating every 10 minutes, until the internal temperature is 145-150 degrees. Let it rest for a minimum of 5-10 minutes before slicing.

Oven preparation:
Preheat oven to 400 degrees.
Heat canola oil in a large, heavy saute pan over medium-high heat. Add pork, and brown all over, about 4 minutes.
Transfer pan to oven. Roast pork, turning occasionally, until the internal temperature is 145-150 degrees, about 15-20 minutes. Transfer pork to a cutting board, and let it rest 5-10 minutes before slicing.


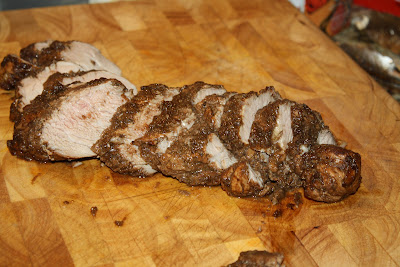
Here it is sliced ... 


Ingredients:

Monday, June 14, 2010

Orange Garlic Grilled Pork Tenderloin


Orange Garlic Grilled Pork Tenderloin
(Courtesy of Cooks Illustrated)

Pork:
2 pork tenderloins, silver skin trimmed off
3 Tbsp kosher salt (or 1 1/2 Tbsp table salt)
3/4 cup sugar
2 cups water (hot)
2 cups water (cold)

In a medium bowl, dissolve the salt and sugar in the hot water. Stir in the cold water to cool the mixture to room temperature. Add the tenderloins and cover with plastic wrap. Refrigerate until fully seasoned (about an hour). While the tenderloin is in the brine, make the wet rub.

Orange Garlic Wet Rub

Ingredients:
1 Tbsp grated orange zest from 1 large orange
2 large cloves garlic, minced (about 1 Tbsp)
1 Tbsp chopped fresh sage leaves
1 Tbsp olive oil
1 Tbsp orange marmalade
1/2 tsp ground black pepper
1/4 tsp salt

Mix all the ingredients in a small bowl.

10-15 minutes before the pork is ready, turn all burners on a gas grill to high, close lid and let the grill get nice and hot. Will take about 10-15 minutes.

When the tenderloin is fully seasoned, remove from the brine, rinse well and dry with paper towels. Rub tenderloin with wet rub. Cook with grill lid closed until well browned on three sides (about 3 1/2 minutes per side) then cook on the final side until well browned and the internal temp. is 145-150 degrees in the thickest part of the meat. Pull the pork off the grill and let rest under a tin foil tent for 5 minutes. Slice and serve

Sunday, December 20, 2009

Orange Chile Glazed Pork Tenderloin

Every time I've ever seen pork, it looks so dry. It just always gets super overcooked. This is a really good way to cook pork and keep it juicy.

Orange Chile Glazed Pork Tenderloin

Pork Ingredients:
2 pork tenderloins (When you buy a package of pork tenderloins, it will generally have two in it)
1 gallon cold water
1/2 cup table salt
1/4 cup cornstarch
2 Tbsp sugar
1 Tbsp table salt
2 tsp ground black pepper
2 Tbsp vegetable oil

Glaze Ingredients:
1/2 cup orange juice
1/2 cup sugar
1-2 tsp red chile flakes

Preheat oven to 375 degrees.

1. Trim the silver skin off both tenderloins.
2. Add cold water and 1/2 cup salt to a large bowl or small bucket to make a brine. Add pork and brine in the fridge for at least 1 hour. (Longer would be fine).
3. Make the orange glaze while the tenderloin is in the brine. Combine orange juice, sugar and chile flakes in a small sauce pan or frying pan. Bring to a simmer and let simmer until it gets thick like a glaze. Set aside.


4. Whisk cornstarch, sugar, salt and black pepper in a small bowl until combined.
5. Pat tenderloins dry with paper towels, then roll in cornstarch mixture until evenly coated on both sides. Thoroughly pat off excess cornstarch mixture. Too much cornstarch will leave gummy spots on the tenderloin.
6. Heat oil in a heavy bottomed skillet over medium high heat until just beginning to smoke. Reduce heat to medium and put both tenderloins in the skillet. Cook until well browned on all sides. Transfer tenderloins to a wire rack set in a cookie sheet.


7. Brush tenderloin with orange glaze and put into preheated oven. Let roast until the thickest part of the pork reads 145-150.
8. Remove from oven, brush with glaze and let rest for 15 minutes before slicing.


Slice and serve

Wednesday, May 20, 2009

Russian pelmeni

A friend of ours went on a mission to Russia quite a while ago and has been wanting to make dinner for us for quite some time now. He finally decided that it was time. So a week or two ago he came over and taught me how to make Russian Pelmeni. We made a meat version and a vegetarian version. I heard from everybody else they liked them combined. That way it wasn't too much of either.
Russian Pelmeni is like a Russian dumpling, or an Italian ravioli (He doesn't like when I call it that) but that's the easiest way to describe it.

Russian Pelmeni Meat Version (Vegetarian version to follow):

1 part ground beef
1 part ground pork
Whatever seasonings you like on meat. We used:
Salt and pepper
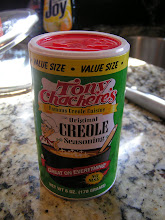
Tony's
Grill seasoning (Steak seasoning)
Garlic pepper
Small amount of lemon pepper
Chili powder
*Optional: Part of an onion grated in for flavor and to help keep the meat moist. Traves completely despises onions so we didn't do that.*
Egg roll wrappers (or fresh noodle dough if you have the time)


(Kelsie's Note: I would not use very much meat, you only use about a teaspoon or so in the actually dumpling. Don't go too crazy when you buy it. Traves bought 2 pounds each and there was quite a bit left over. We also fed 7-8 people.)

Mix the meat by hand until well blended. Don't overmix or the meat will become tough.


Mashed Potato Pelmeni (Vegetarian version):

Ingredients:
Potatoes
Whatever you like in your mashed potatoes
We used the following:
Butter
Sour cream
Tony's
Garlic pepper
Salt and pepper
Egg roll wrappers (or fresh noodle dough if you have the time)

Cube the potatoes and boil until very tender for mashing. Add butter, sour cream and seasonings and mash well. This is the filling for the vegetarian.


If you make a little of each, then you can have a combination of both potato and meat dumplings.


Here is the meat filling ready to go:


Once you have both fillings ready it's time to put them into the dough. We used a biscut (or a round cookie cutter) to cut the egg roll wrappers into four circles per sheet. (we bought the large egg roll wrappers) Our circles were about 2 3/4" in diameter. You can use a glass or whatever you have to cut the wrappers.


Place a small amount of filling into the center of the wrapper and wet all the way around the edges with water. This will allow the dough to stick together and not to fall apart. (For the most part. Some will still fall apart).

Fold in half and press the edges tight.


This part is hard to see because of the photo, but you are going to fold in half now the other direction. You will have the seam facing away from you.


Here is what they look like all folded up.


Once you have them all ready to go, bring a pot of water to a boil. Once it's boiling, salt well.

Add dumplings to boiling water and boil for 8 minutes (on the meat ones to cook the meat) and just a minute or two after they start floating on the potato ones. I boiled mine in two different pots so I knew which ones were ready to be taken out.

Traves likes to top his with just sour cream and salt and pepper. He said you can top it with anything you like. Tomato sauce, cheese, etc. I've only eaten them once so I have no idea what else to pair them with. The sour cream and salt and pepper were good though.

If you have way too many left over you can freeze them (if they are still raw) then you can just pull them out whenever you want them. You can also spend all day long making tons of them and just freeze them so next time you want them you don't spend all day making them.
Related Posts with Thumbnails